
Instructions for Use

Intelligent Battery System
This picture light is for use only with the components supplied by Charter Lighting.
The LED light must be powered at all times through the Brain Box and Battery Pack provided; never plug this product directly into a mains power supply socket.
Use the charging components supplied for optimum results.
Note - Picture lights 18” and have different charging components allowing for in situ charging of the battery pack.
Introduction
The re-chargeable Intelligent Battery Power Supply supplied by Charter Lighting has been specially developed to provide the optimum balance between
• Performance
• Durability
• Size
• CostThe Picture Light itself is fitted either on the wall or onto the frame at the top of the painting (most typically the latter) by means of the metal bracket provided. Screws are NOT supplied since picture frames come in such a huge range of profiles that an appropriate length of the screw can only safely be determined by the user.
Up to ten screws will be required in total to fit all these components; four or eight for the picture light itself, depending on whether it has one arm or two, and two each for the two-part Intelligent Battery Power Supply components.
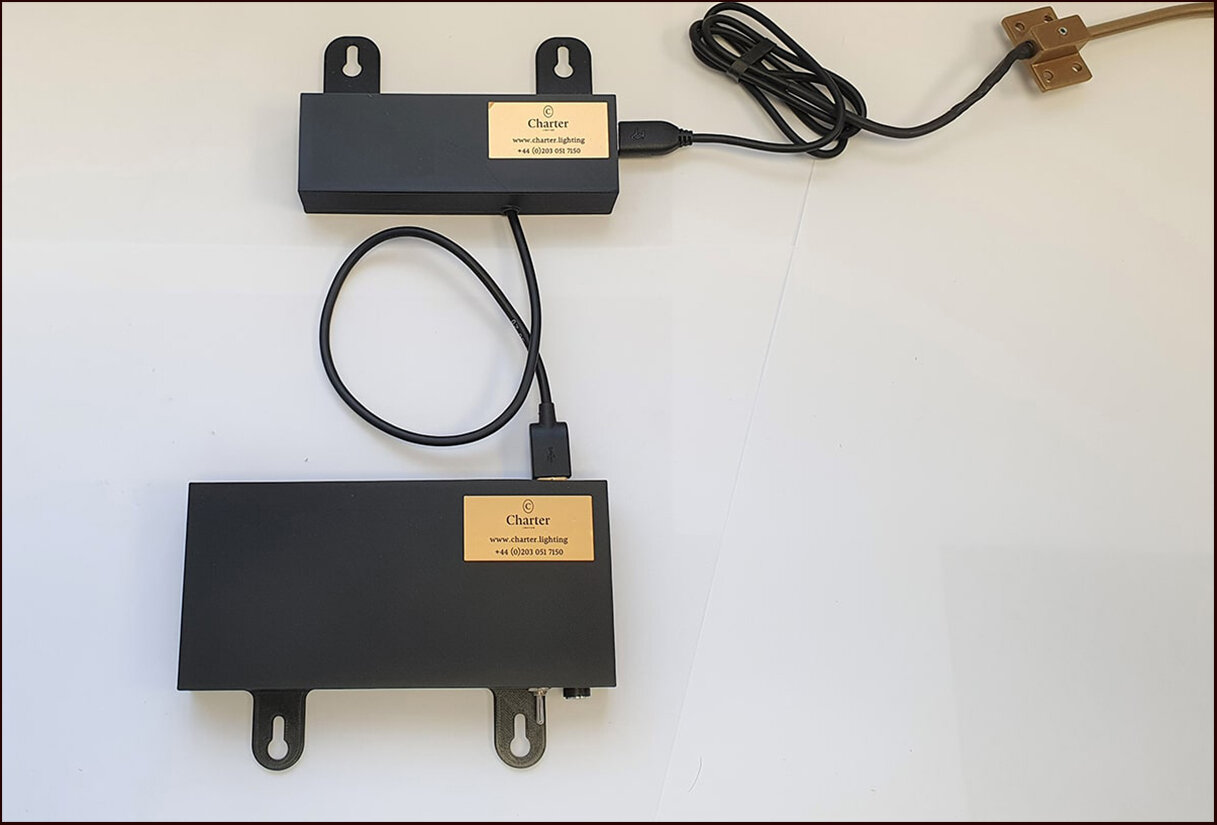
The Intelligent Battery Power Supply comes in two parts, both of which should be mounted onto the same surface as the picture light itself - be that onto the wall or on the frame of the painting.
The Intelligence is contained in the Brain Box, which should be attached to the top of the picture frame (or upper wall location). The design of this allows the fixing points via the two key-holes to straddle the mounting bracket which secures the picture light itself. If the picture light has two arms the brain box will fit between the two mounting brackets.
Facing upwards in this way, with the red battery-low indicator LED at the top, means this light should be visible as a reflected glow off the wall behind the painting when battery power is running low.
The Battery Pack should be attached to the bottom of the frame (or lower wall location), using the key-hole fixing points (for picture lights 12” and under) or velcro (for picture lights 18” and above).

Picture Light & Intelligent Battery Power Supply Components Fitted
The Component Elements
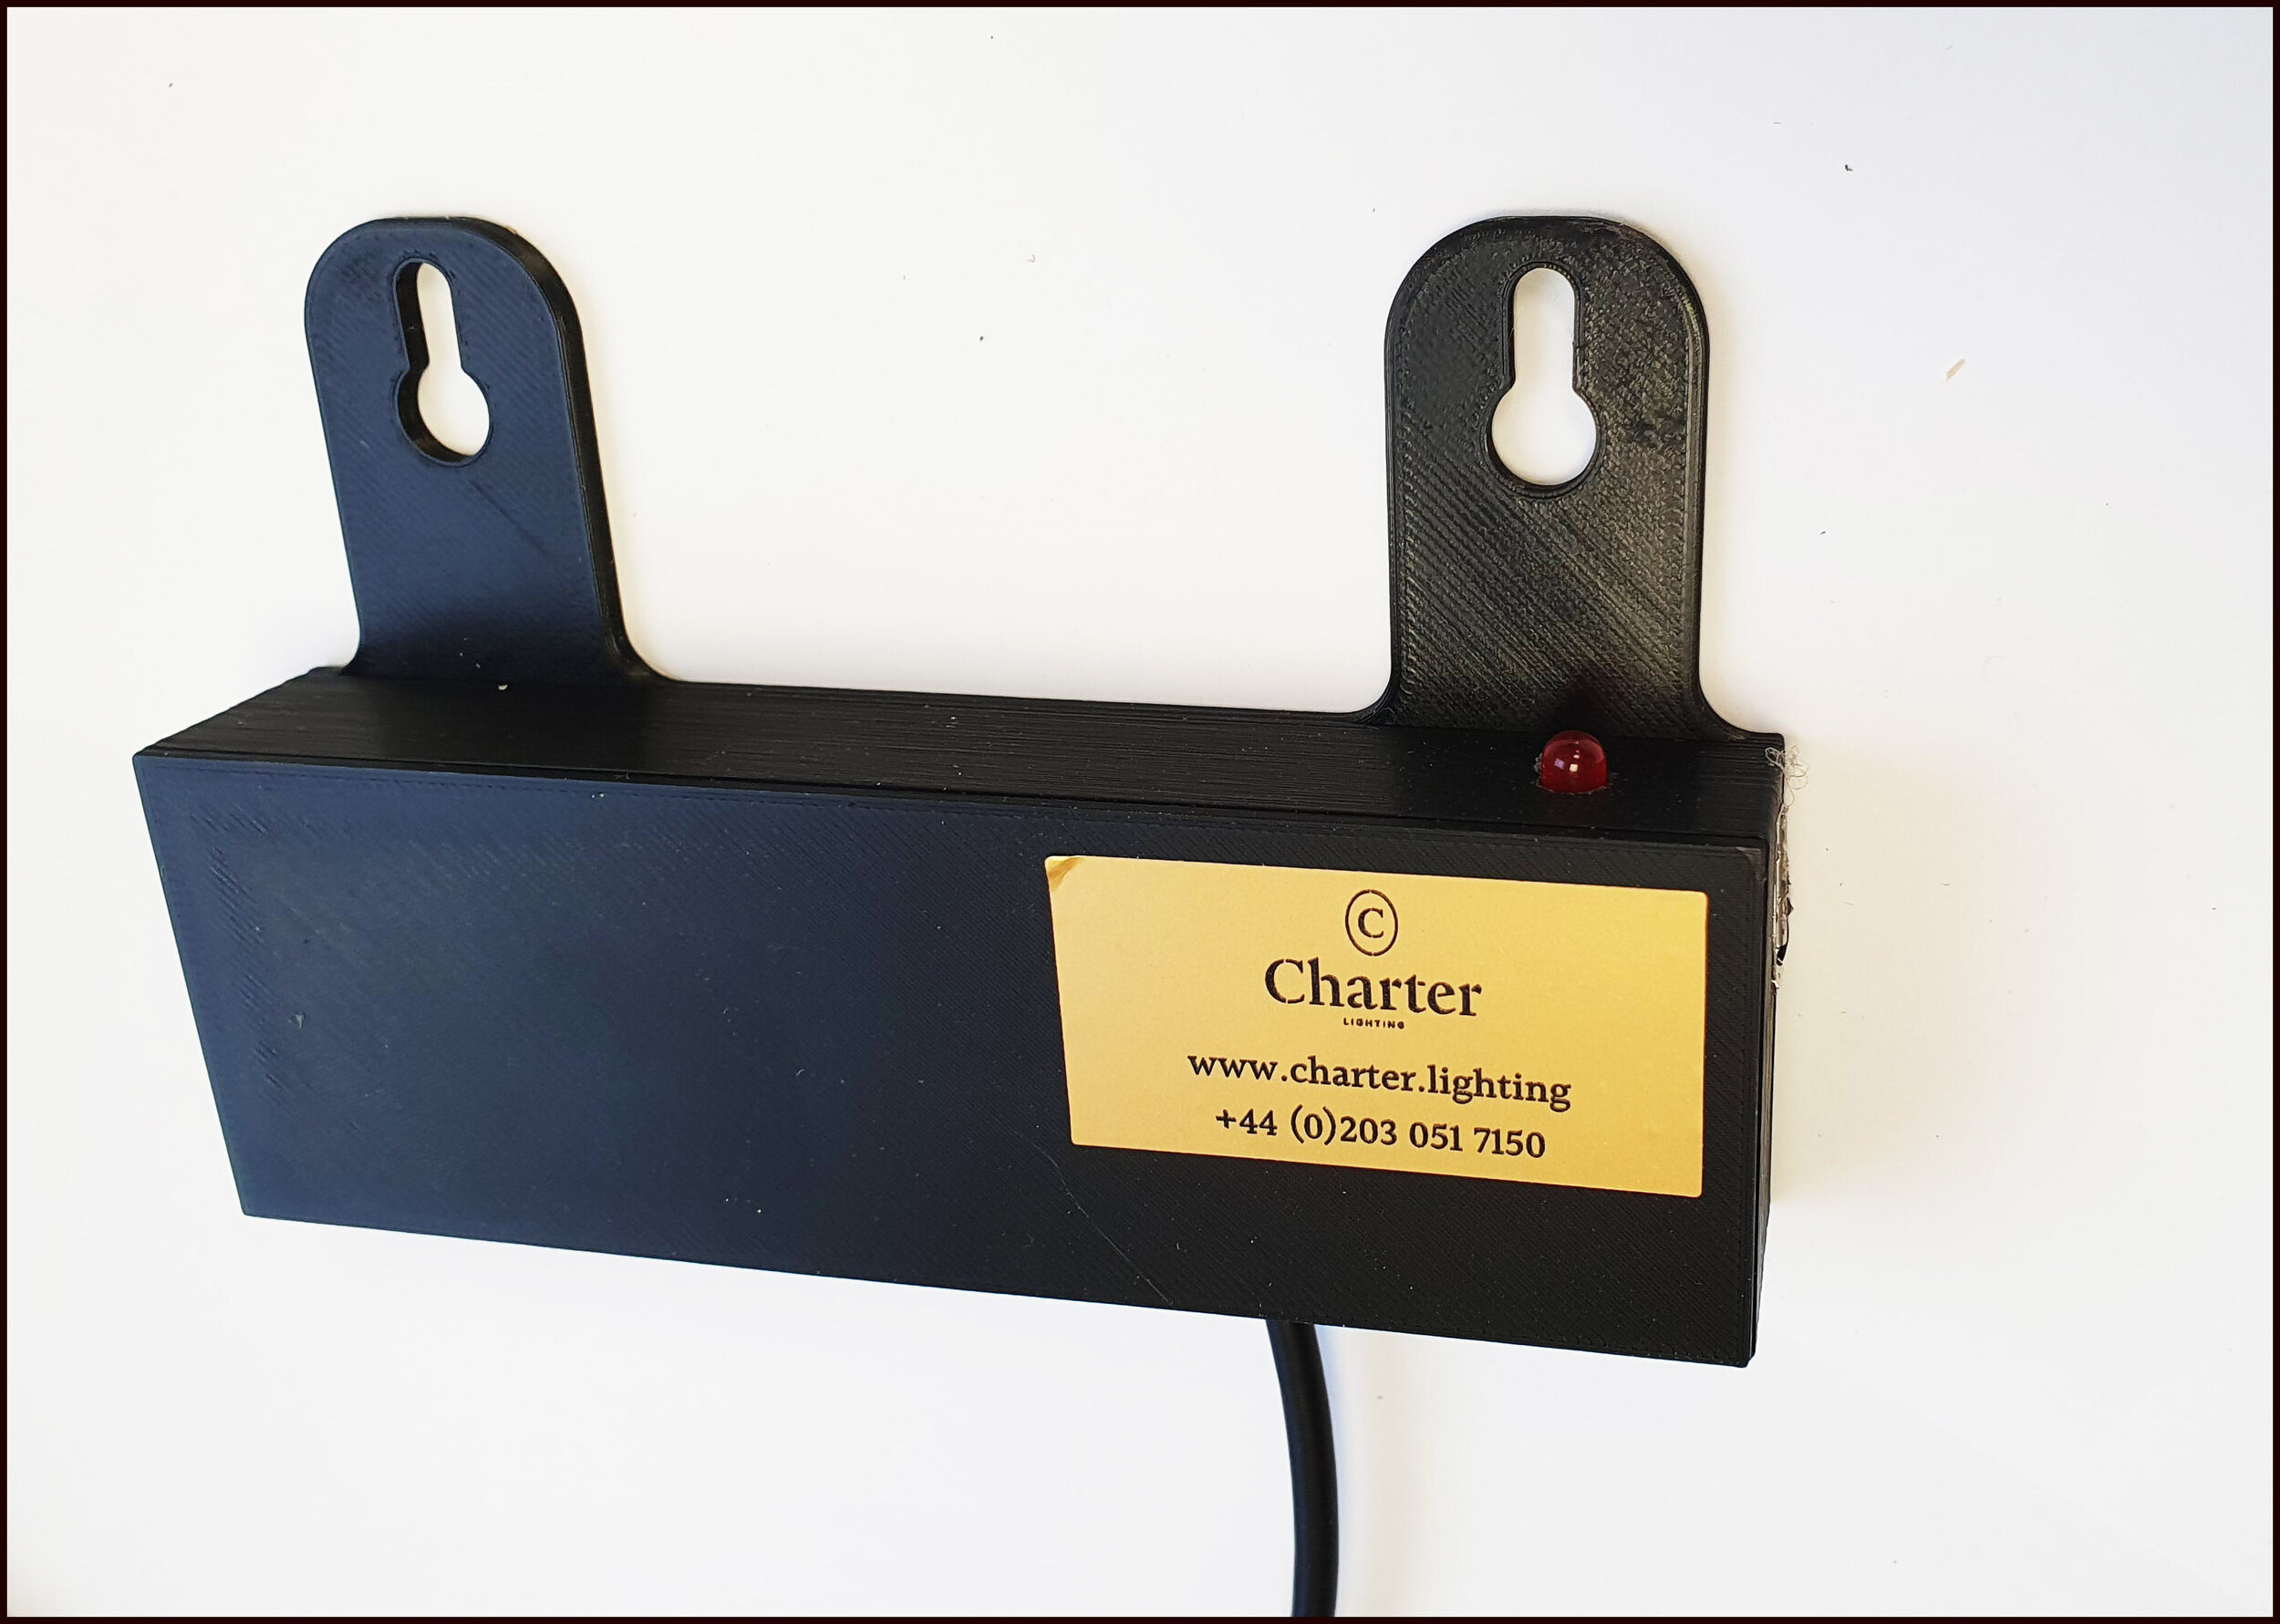
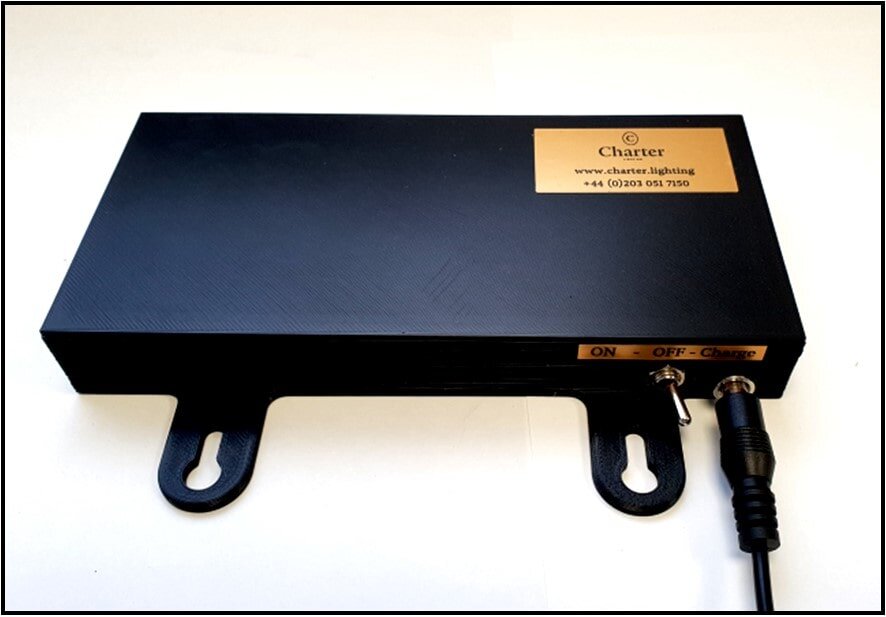
7. The Brain Box, above, showing the red battery-low indicator light at the top. The free end of the wire exiting through the arm of the picture light connects into this, and a separate cable connects it to the Battery Pack below.
All connections and interconnections use familiar USB cables with standard connectors and sockets.
For picture lights 18” and above click here to read instructions specific to these sizes.
For Diddy, 6” and 12” lights continue below.
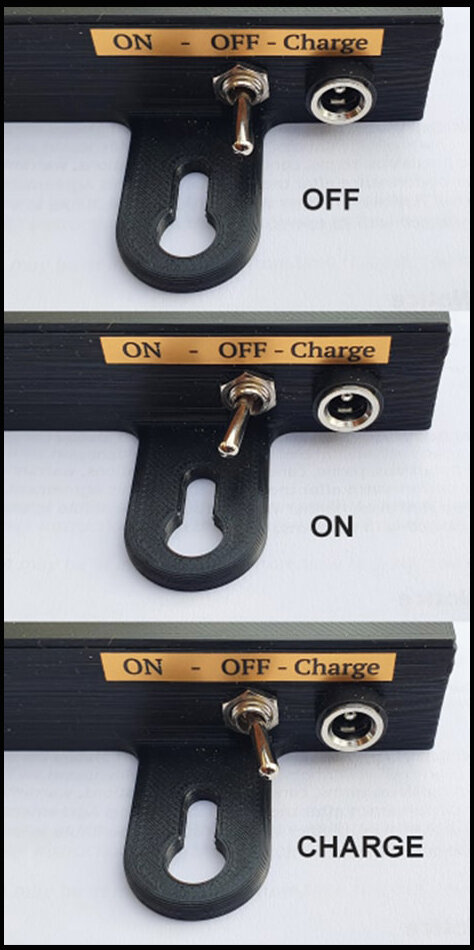
8. The battery pack should be attached using the two keyhole attachments for screws along the lower edge of the pack. Fit this quite loosely, so that it is easy to lift the pack up and off for re-charging. The USB connector on the free end of the wire from the brain box connects into the socket on top of the battery pack. On the bottom of the pack is the ON-OFF-Charge switch, and the charging socket.
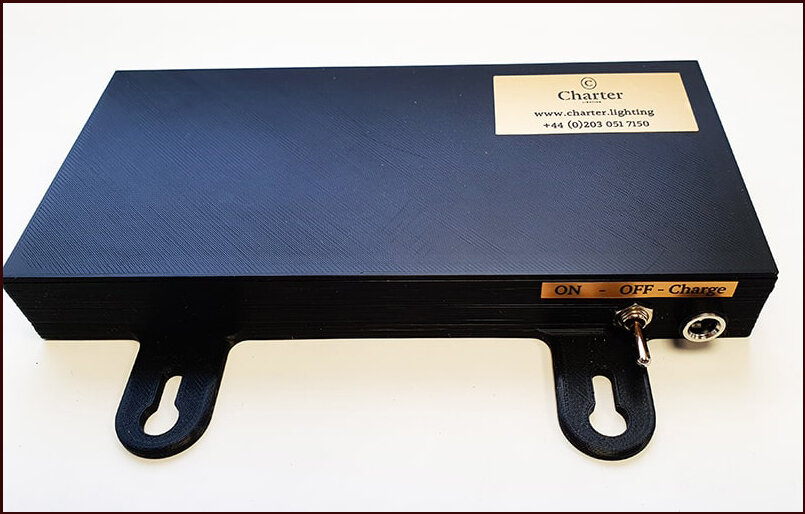
9. Before connecting the wire from the brain box into the battery pack, ensure that the ON-OFF-Charge switch is in the OFF position. This protects the system from power kick-back.
10 .Once connected, turn the switch ON, and the picture light will illuminate to full intensity.
11. Thereafter, On/Off/Dim activation of the picture light is via the hand-held RF remote control and, except as otherwise indicated in these instructions, the system can be left with the switch set to the ON position at all times.
The Batteries
Only use the battery pack supplied with the product.
12. The Lithium Ion batteries, which are manufactured exclusively for Charter Lighting, have an operating voltage of between 2.5 and 4.2 volts, and are fitted in pairs. Battery Packs contain a minimum of two and up to a maximum of six batteries, depending on the size of the picture light.
13. The battery-pack ‘intelligence and monitoring’ software has also been specially developed to ensure that
power to the LED/s is constantly being modulated to ensure consistency of the light level throughout usage;
the batteries never completely discharge, thereby assuring their longevity.
14. The monitoring software puts the batteries ‘to sleep’ once they have reached a safe threshold of depletion. Thereafter, the batteries will only become functional again once they have been fully re-charged.
15. Each pair of batteries powers one LED in a Charter Lighting Art Light for up to 25 hours. A 6-battery array (the maximum in a pack) will power a single LED for up to 75 hours.
16. Picture lights which incorporate more than one LED will deplete the batteries pro-rata at a faster rate.
17. A battery-powered solution is most frequently deployed in conjunction with our renowned Very Diddy Art Light (one lensed LED), although larger picture lights— up to 30cm (12”) long and containing four lensed LEDs—can be battery-operated. Such a combination, with a full six-battery pack being operated at initiation intensity, will lead to some 20-25-hour intervals between charges.
18. The life of the battery pack is 500 charge cycles.
19. Each battery reaches full charge in 2 hours, so each pair of batteries will require 4 hours’ charging. A 6-battery pack will therefore take twelve hours (or over-night) to re-charge fully.
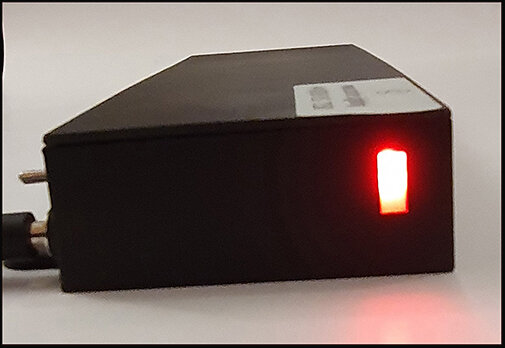
20. The assembly features a constantly-updating monitoring system which has been incorporated to provide the user with a pre-depletion notice. When the battery ‘reservoir’ has dropped to approximately 10% capacity, a red warning light ignites.
21. This red light has been set onto the top edge of the Brain Box so that the warning is clearly visible without having to demount any of the elements.
22. At this point, the battery pack should be removed and re-charged, in line with the instructions.
Operation and Control
Only use the remote control provided with the product.*
23. Make sure the ON-OFF-Charge Switch is set to the ON position. This will automatically switch the Picture Light ON, to the initiating light level setting.

Switch set to ON postion
24. Control of the light is now via the RF remote control device, which also allows for considerable and sophisticated variation over its intensity.
25. The use of RF (Radio Frequency) technology enables a broader scope of signal acceptance. The RF receiver is contained in the Brain Box set behind the painting.

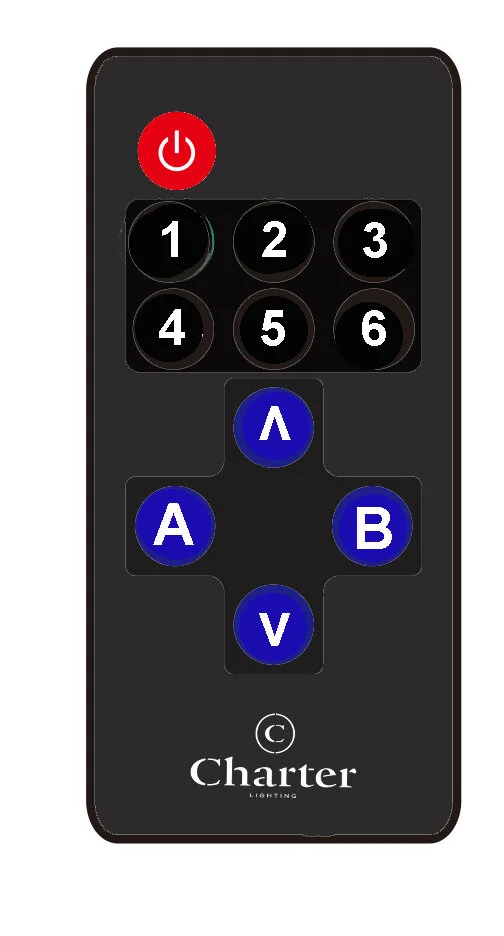
26. Use the on/off Power Button to turn the light ON, holding it down for up to 5 seconds (the unit ‘goes to sleep’ to conserve battery power and may need a bit of time to ‘wake up’. Once alight, control the light levels as follows:
• Use Button 1 to increase the light level to maximum
• Use Button 2 to set the Picture light to 90% intensity
• Use Button 3 to set the Picture light to the initiating light level.
• Use Button 4 to set the Picture Light to 70% light level
• Use Button 5 to set the Picture Light to 60% light level
• Use Button 6 to set the Picture Light to 50% light level
• Use Button ʌ to tune the light level up in intermediate steps
• Use Button v to tune the light level down in intermediate steps
• Use button A to recall the latest light level set via ʌ or v controls
27. Use the red Power Button to turn the light OFF.
28. The Intelligent Battery System has been carefully calibrated to ensure constancy of light levels over an acceptable usage span. The objective is to provide illumination for up to 5 hours a day during the course of one week before the batteries need to be re-charged.
29. It achieves this balance when operated at the Initiation light level. When the light is operated at brighter settings, the batteries will deplete faster; running the light at low settings will lengthen battery life.
30. A selective memory functionality has been programmed into the system. The system automatically stores the user setting when either the Arrow Up or Down button is pressed. This user setting is recalled by pressing the A button even after a total switch off.
31. When the light is switched off, intelligent monitoring software shuts the system down into ‘deep sleep’ to protect battery life. This is why new activation of the light requires application of the On Button for up to 5 seconds, thereby enabling the monitoring software to ‘wake up’ at least once in order to respond to the instruction.
32. For extended periods of non-use, such as times of absence from the property, the whole battery-pack should be switched off by turning the ON-OFF-Charge Switch to the OFF position.
If you lose your remote control, you will need to return the Brain Box part of the Battery Supply System to Charter Lighting. This can be re-programmed for the replacement remote control.
Charging
Only use the charging components supplied with the product.

33. The time between charges will depend upon
• The number of hours the picture light is in use each day (or week)
• How many LED lights are fitted into the picture light head
• The brightness levels at which the light is maintained
For operational hours and charging duration, see Points 11. – 13. above.
34. To recharge the battery-pack, switch the battery pack to the off position, disconnect the USB-A connector from the socket on the top of the box and detach the whole battery pack from its mount by the slide-up-and-off movement.
35. Insert the charger plug into a standard 13-Amp wall socket and, using the connecting cable provided, plug the USBA connector on one end into the plug (as if to charge a smartphone or tablet device) and the cylindrical jack plug on the other end into the charging socket on the battery unit.
36. To set the battery pack device into ‘Charge’ mode, turn the ON-OFF-Charge Switch to the ‘Charge’ position.
37. Switch on power at the mains socket and leave the device connected for the required amount of charge time.
On the side of the battery pack enclosure near the charging point is a panel of 4 miniature LED diagnostic lights. These will light up progressively and flash while charging is in progress. Once charging is complete, all four indicator lights will stay alight.
38. A regular re-charging routine is recommended – rather as might be adopted for winding up a pendulum clock. This will prevent disappointment, which is bound to occur just when friends have been invited round to admire a new addition to your collection!
Trouble Shooting
All the component elements, assembled products, and services suppled by Charter Lighting are of the highest and most reliable quality available to us.
Our LED picture lights are not only of the very best light quality, in terms of colour temperature and correlated colour rendering index, but also carefully maintained in optimum operating conditions to ensure their longevity.
The batteries and all other components in the Intelligent Battery Power Supply have been selected and configured to give you reliable operation and what we hope is useful transparency at all stages.
The ON-OFF-Charge Switch has one final function.
If, for any reason, the light will not operate when all the correct procedures have been followed, use this Switch as the Reset-Button.
All micro-processes need to be re-booted from time to time, and your new Charter Lighting Intelligent Battery Power Supply is no different!
To reboot your light, turn the Switch to the OFF position, leave for a full ten seconds, and then turn it back to the ON position again.
Thank you for choosing Charter Lighting to assist you with your Picture Lighting requirements. We hope you enjoy using your new battery-operated picture light, and wish you many, many years of pleasure in so doing.
All our products are hand crafted with care in the UK